Sunday, November 3, 2013

How To Change Default Posting Date for Parking Documents

Use

You specify the posting date when a document is parked. However, when the document was approved or posted on a different date, you need to define whether the posting date of the parked document will remain unchanged or will it adopt the system date or the date at which the document was actually approved for posting. This post will show how you can configure the default Posting Date for your Parked Items.


Procedure:

1. On the Customizing screen, go to Financial Accounting (New) > Financial Accounting Global Settings (New) > Document > Document Parking > Change Posting Date for Parking Documents.

2. Alongside the Company Code, specify the posting date procedure or setting for your parked documents.


Note:
This can only be used in FI Classic parking transactions since the user can change the posting date of a parked item anytime using the SAP Enjoy Posting transactions.

How To Configure Standard Cash Flow Statement (Direct) in SAP

Use

SAP has standard Cash Flow Reporting functionalities that are often disregarded or unused. The reason can be because we require a different format or that configuring the standard  is sometimes more tedious than creating a functional specification from scratch. Either way, it is still best to know how to do standard reporting and be a little conversant in using the report painter.

This post will show how you can make use of the standard Cash Flow Statement and configure it based on your own requirement.


Prerequisite

You should be able to define your own Financial Statement Version.


Procedure

1. Go to FSI6: Report Painter: Display Form

2. Select Form Type > 002: Financial Statement Key Figures

3. Double click 0SAPRATIO-04: Cash Flow (Direct)

4. Click Edit icon.

5. On the Menu Bar, select Edit > Gen. Data Selection.

6. Change Financial Statement Version: INT to the Financial Statement Version of your company or client then click Confirm. 

7. On the Form, edit items and assign accounts to each Cash Flow Items based on your requirement.

8. Click Save.

9. To view report, go to transaction S_ALR_87012271 - Cash Flow (Direct Method).

10. Specify specific details such as Company Code and Fiscal Year then click Execute (F8).


How to Configure Default Line Layout for a More User-Friendly Incoming Payment Processing (F-28 / FBZ1)

Use

To be able to give our end-user a better appreciation of the incoming payment processing in SAP, we can modify the default layout of the open items in the incoming payment program (F-28 / FBZ1). We can assign fields that are necessary and are relevant in evaluating open items in the customer account. With this, end-user can easily select line items/invoices that are relevant to the payment received. 

Procedure

1.  On the Configuration (IMG) screen, go to Financial Accounting (New) > Accounts Receivable and Accounts Payable > Business Transactions > Incoming Payments > Manual Incoming Payments> Make Settings for Processing Open Items > Define Line Layout (O7Z4S)

2. Click Create or Shift+F1.

3. Assign Line Layout code and Description then hit Enter.

4. Click Insert after... then double click the Field Name from the Field list that you want to show during the open item processing in F-28 or FBZ1. Repeat as needed.

5. Click Save button to create the Line Layout.

6. Next, go to  Financial Accounting (New) > Accounts Receivable and Accounts Payable > Business Transactions > Incoming Payments > Manual Incoming Payments> Make Settings for Processing Open Items > Choose Standard Line Layout (O7V3)

7. Double click FBZI: Post Incoming Payments. 

8. Select Customer then assign the created Line Layout on the Detail Screen then click Enter.

9. Select F12 or simple close the remaining Selection window. 

10. Click Save.

Result

When you process F-28 / FBZ1, the selected fields in the assigned layout was shown.


How to Easily Identify Partial Payment and/or Credit Memo of an Invoice during Open Item Processing in F-28 / FBZ1

Use

This technique can help end-user who is processing customer incoming payment in SAP using F-28. User can easily identify if a particular invoice has been partially paid and/or if a credit memo exists for that invoice.


Procedure

1. On transaction FB00 under Open items tab, ensure that the Include invoice reference is selected. 


Alternatively,

1. On the Post Incoming Payment Process open items screen of F-28, click.

2. Check the  Include invoice reference option.

3. Click Save and go Back to the Open Items screen.


Result

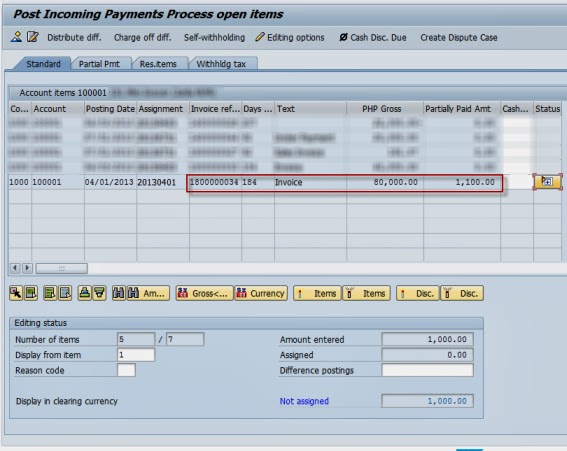
If there is an existing partial payment or credit memo, you can immediately notice that they have been grouped according to their invoice reference. You can also see that Partially Paid Amount column appears. The total credit memo and partial payments for the invoice were calculated.


How to Set Special Options for Single Screen Transactions where Document Date equals Posting Date

Use

On our day to day transactions in SAP, there are several options where you can make a customer invoice posting a little bit easier. One example is by setting your Document Date to equal your Posting Date.

Note: This is only applicable to Single Screen Transactions of SAP.


Procedure
1. Go to FB70 and click .

2. Under Special Options for Single Screen Transactions, tick Document date equals Pstg Date.

3. Click Save.

4. Exit the transaction to take effect.


Result


Upon accessing FB70: Enter Customer Invoice again, you'll notice that the Invoice Date/Document Date is automatically filled.


How to Quickly Access General Ledger, Accounts Payable and Accounts Receivable Reports

Use
For periodic reporting needs, we usually access the SAP information system through the menu tree. However, instead of using such, there is an easier way to access these reports. This post will show you have to access FI-related reports using a four-character transaction code.

Procedure


  • Use Transaction Code F.97 to access General Ledger-related Reports.


  • Use Transaction Code F.98 to access Accounts Payable-related Reports.


  • Use Transaction Code F.99 to access Accounts Receivable-related Reports.


Tuesday, February 26, 2013

How to Mass Edit The Assignment Field in Customer Line Item Display (FBL5N)

Use
When you need to edit a field for several line items, you can simple select those items and type in the new value of that field. This method is useful specially when you need that certain field as a category for reporting or automatic clearing.

Procedure

1. Select the documents that needs to be changed.

2.  Click the Mass Change button.


2. On the New Values screen, fields that can be changed are shown. Input the new value.


3. Click Execute changes.