- SAP Best Practices (Baseline) for Philippines
- Tips and Tricks
- SAP Links
- 20 Things You Need To Learn About SAP Financial Accounting
- 20 Things You Need To Learn About SAP Controlling
- 20 Things You Need To Learn About SAP Authorization
- 20 Things You Need To Learn About SAP Sales and Distribution
- How to Pass SAP Certification for Financial Accounting ECC 6 EHP 4
- How to Pass SAP Certification for Management Accounting ECC 6 EHP 6
Monday, April 21, 2014
My SAP Financials Blog Topics
Below are the topics that are soon to be published in this blogsite:
Monday, November 11, 2013
How to Download Spool in SP02 as PDF
Procedure
1. Go to SA38 then execute RSTXPDFT4 program.
2. Enter Spool number found in SP02.
3. Tick Download PDF file.
4. Enter Directory and PDF File Name.
5. Click Execute.

1. Go to SA38 then execute RSTXPDFT4 program.
2. Enter Spool number found in SP02.
3. Tick Download PDF file.
4. Enter Directory and PDF File Name.
5. Click Execute.
Thursday, November 7, 2013
How to Define Sensitive Fields for Vendors (S_ALR_87003179)
Use
Changing an existing master data for vendors / customers such as bank data can lead to fraud if not properly monitored. For example, if the person authorized to edit master data can change the details without confirmation, he/she may change the bank account of the vendor to his/her own bank account which can be left unnoticed. Upon execution of the automatic payment, the fraudulent bank account is debited instead of that of the vendor. Even if this can be detected through executing the report for master data changes, this can a little too late to prevent the fraud.
To set a preventive over detective control for these master data changes, we can define sensitive fields in SAP that can automatically block a vendor invoice for payment until such change has been confirmed by an authorized person. This is to say that when a person changes a sensitive field in the vendor master, another person should confirm this change.
Here are the steps on how you can define sensitive fields for vendor master:
Procedure
CONFIGURATION
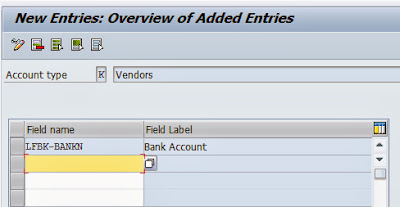
1. On IMG menu, go to Financial Accounting (New) > Accounts Receivable and Accounts Payable > Vendor Accounts > Master Data > Preparations for Creating Vendor Master Data > Define Sensitive Fields for Dual Control (S_ALR_87003179).
2. On the Change View "Sensitive Fields": Overview, click New Entries.
3. Under Field Name, enter the table plus the technical field name or use F4 to find the available fields that you can set as sensitive
4. Click Save.
CHANGE VENDOR MASTER DATA - FK02

AUTOMATIC PAYMENT RUN - F110

CONFIRM CRITICAL VENDOR CHANGES - FK09

Changing an existing master data for vendors / customers such as bank data can lead to fraud if not properly monitored. For example, if the person authorized to edit master data can change the details without confirmation, he/she may change the bank account of the vendor to his/her own bank account which can be left unnoticed. Upon execution of the automatic payment, the fraudulent bank account is debited instead of that of the vendor. Even if this can be detected through executing the report for master data changes, this can a little too late to prevent the fraud.
To set a preventive over detective control for these master data changes, we can define sensitive fields in SAP that can automatically block a vendor invoice for payment until such change has been confirmed by an authorized person. This is to say that when a person changes a sensitive field in the vendor master, another person should confirm this change.
Here are the steps on how you can define sensitive fields for vendor master:
Procedure
CONFIGURATION
1. On IMG menu, go to Financial Accounting (New) > Accounts Receivable and Accounts Payable > Vendor Accounts > Master Data > Preparations for Creating Vendor Master Data > Define Sensitive Fields for Dual Control (S_ALR_87003179).
2. On the Change View "Sensitive Fields": Overview, click New Entries.
3. Under Field Name, enter the table plus the technical field name or use F4 to find the available fields that you can set as sensitive
4. Click Save.

CHANGE VENDOR MASTER DATA - FK02

AUTOMATIC PAYMENT RUN - F110

CONFIRM CRITICAL VENDOR CHANGES - FK09

How to Create or Modify SAPSCRIPT Form
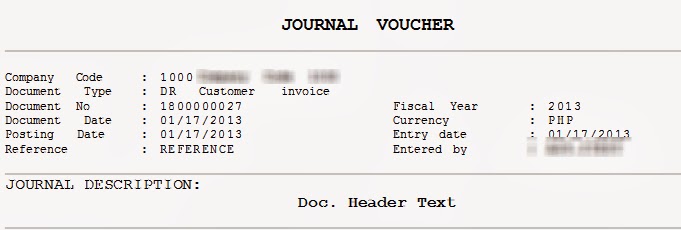
I've created a Journal Voucher form from a standard Internal Document form (YB_F140_INT_DOCU). I will share how this is done once I've finalized the document.
Here is a sneak peek :-)
How to Transform Standard Internal Document Form Without Creating a Customized Form or Customized Program in a Day
Standard Form

Transaction Codes to Remember
SE71 - Form Painter
OB96 - Assign Forms to Program
OB78 - Allocate Program for Automatic Correspondence
S_ALR_87003354 - Determine Call Up Function for Correspondence Type
F.61 - Print Correspondence As per Request
F.62 - Print Correspondence for Internal Documents
Here is a sneak peek :-)
How to Transform Standard Internal Document Form Without Creating a Customized Form or Customized Program in a Day
Standard Form

Enhanced / Modified Form
Transaction Codes to Remember
SE71 - Form Painter
OB96 - Assign Forms to Program
OB78 - Allocate Program for Automatic Correspondence
S_ALR_87003354 - Determine Call Up Function for Correspondence Type
F.61 - Print Correspondence As per Request
F.62 - Print Correspondence for Internal Documents
Tuesday, November 5, 2013
How to Set Up Reason Code in Accounts Receivable (OBBE)
Use
Reason Code in A/R is one of the best way to distinguish partial payment over residual payment method. Setting reason code to justify why a certain invoice is underpaid or overpaid can help you analyze the transaction and assign the correct G/L to the difference. With this, you can also automatically set the description or text that will appear on the line item.
Procedure
1. On the IMG menu, go to Financial Accounting (New) > Accounts Receivable and Accounts Payable > Business Transactions > Incoming Payments > Incoming Payments Global Settings > Overpayment/Underpayment > Define Reason Codes (OBBE).
2. Enter Company Code.
3. Choose New Entries.
4. Enter the following:
5. Click Save.

Reason Code in A/R is one of the best way to distinguish partial payment over residual payment method. Setting reason code to justify why a certain invoice is underpaid or overpaid can help you analyze the transaction and assign the correct G/L to the difference. With this, you can also automatically set the description or text that will appear on the line item.
Procedure
1. On the IMG menu, go to Financial Accounting (New) > Accounts Receivable and Accounts Payable > Business Transactions > Incoming Payments > Incoming Payments Global Settings > Overpayment/Underpayment > Define Reason Codes (OBBE).
2. Enter Company Code.
3. Choose New Entries.
4. Enter the following:
- Reason Key
- Short Text
- Long Text - This portion appears on the Line Item Text field.
5. Click Save.
Sunday, November 3, 2013
How to Set Clearing Text for All Open Items Selected for Clearing
Use
During open items clearing, either for customer, vendor or general ledger, we can set the clearing text for all selected open items to ensure that the text portion of the line item is not left blank for reporting purposes. Instead of typing the same text for all this items individually, we can simply set one clearing text that will be applied to all of these items.
For the purpose of this illustration, we will use Incoming Payment Processing transaction or F-28.
Procedure
1. Go to Incoming Payment Processing (F-28) and input the necessary data until you reached the open items selection screen.
2. Select the items to be cleared.
3. On the Menu Bar, go to Edit > Clearing Text or simply click Ctrl+F2.
4. Input the Clearing Text and click Enter.
5. Upon Simulation, you'll notice the offsetting customer line items are automatically filled with the clearing text you entered.
Please note that this (Clearing text) is the same as the field found in the F-28 initial screen. If you were able to maintain the details initially, this can be skipped.
How To Show Hierarchy Display in FS00
Use
This functionality is useful in maintaining single or multiple General Ledger accounts. With this, you can maintain and/or monitor accounts under a certain account group. You can also easily locate similar account and use it as a reference in creating a new GL account.
Procedure:
1. Go to Display G/L Account Centrally screen using Transaction Code FS00.
2. On Menu Bar, click Settings > Hierarchy Display > Display Accounts in Navigation Tree.

Subscribe to:
Comments (Atom)